Add tabs and bookmarks to Windows Explorer

Windows Explorer with TabsProblem:

Have you ever been bogged down and feel lost by the many number of windows explorer windows you end up opening when working on some project?

Have you felt next to impossible to find and navigate to an already open windows explorer window from the large number of already open windows?

Internet explorer previously faced a similar problem (any IE 6, or previous, user??).

Ever thought Windows Explorer had tabs facility like browsers these days do?.

Solution:

Clover is a nice littler freeware that is helpful in making windows explorer  better than before.

It adds the very useful but missing tab and bookmarks functionality to existing windows explorer features.


I have personally been using this, and hope it is helpful to you as well.

Explore Learn and Understand Chrome Developer Tools

Chrome DevToolsMost of you would already be familiar with Developer Tools in Chrome browser (a.k.a. Chrome DevTools). These tools are a must know for both
1) web-designers, and
2) web-developers (especially javascript developers)
to not only
1) try their ideas out immediately, but also to
2) debug and find out problem areas (like errors, why something is not working, loading time of page and resources like images and other referenced files).

Chrome DevTools Menu
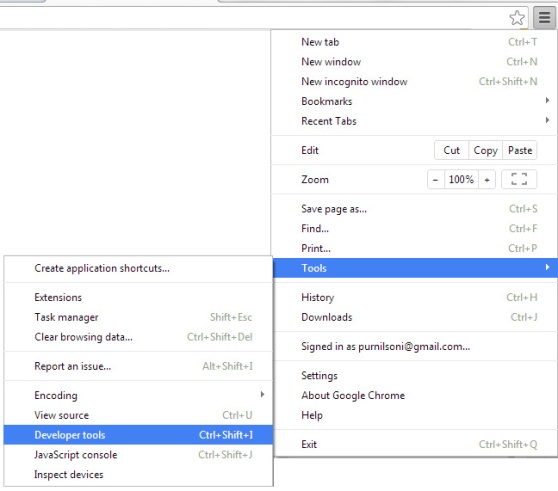
Note: It is not that such functionality is not available in other modern browsers (viz. Internet Explorer, Firefox, Opera etc.), but what makes it interesting and particularly important to talk about chrome browser in this article is to the fact that chrome is the most standards compliant and rapidly evolving browser out there today. So no hard feelings for other browsers, but we’ll be only talking about development tools in chrome here. 

Because of these it is inevitable for any web-developer or web-designer to learn the features provided by these Developer Tools in Chrome Browser.

At this point some of you may be thinking that “hey, I already know these and have been using it already“. But for all such friends out there, it has been my observation and experience that there are a lot of features out there in these tools, and we only use part of them, and rather know only fraction of them.

I believe that

“You cannot use a tool/weapon/feature if you don’t know about it”

With that the first thing to do is know all that is available, so that you can pick up appropriate tool/weapon when in need of one. And am sure that you would have faced such situation in your life where in you would have thought “hell, I never knew these were also possible with this tool“.

So it is always a need to get to know the swords and weaponry available in these developer tools (as there are many to be explored), and I truly believe that once you are aware about most of the features (if not all) provided by these Developer Tools, you would always thank yourself that you spared time for this task.

Now coming to the point where you would be asking “Ok, so am ready to put in time to learn and understand these so called ‘Chrome DevTools’ but then what is the best resource of doing it?“.

So to answer that without taking much of your time, below are two great and free resources to learn/understand/explore these Chrome DevTools:

1) Video Tutorials with hands on exercises by CodeSchool

CodeSchool Chrome DevTools Tutorial

2) Official Chrome DevTools website

Official Site

Why two resources: because some are more comfortable learning by watching and some by reading. The video tutorials are for the “watching” type of you and the official website material are for the “reading” types of you out there. Also, the video tutorials would be a great quick starter for important features.

Note though that the video tutorials don’t cover all of the functionality available, but they do cover most of the important stuff out there that you would find yourself using the most. So once you are through the video tutorials, for further deeper reference and for other functionality not covered in video tutorials, I highly recommend going through the official website material at your own convenience.

At the end, I also recommend going though all the keyboard shortcuts for a faster and smoother use of these DevTools.

Happy Learning !!

Goodbye 2013

Completion of one more great year 2013 … and start of another exciting year 2014.

May this new year bring loads of happiness and good luck to all of yor my dear readers. HAPPY NEW YEAR !!!

If you’d like to explore how we did this year, the WordPress.com stats helper monkeys prepared a 2013 annual report for my blog.

Here’s an excerpt:

A New York City subway train holds 1,200 people. This blog was viewed about 7,300 times in 2013. If it were a NYC subway train, it would take about 6 trips to carry that many people.

Click here to see the complete report.

See you in 2014. Happy New Year !!

Hide left Navigation in SharePoint, but not the Group selector on People and Groups Page

SP2013_logoProblem:

We want to hide the left navigation bar that shows the quick links, and make the main content take up this space as well (i.e. main content uses full page width from left to right).

sp2013_QuickLinks

This can easily be done by adding a css to your master page as below (as told in many blogs/articles):

#sideNavBox { display: none } /* hide left navigation box */
#contentBox { margin-left: 0px } /* make content take full page width */

But then when you visit pages which show you other additional things in left navigation panel in addition to quick links, then even these other additional things are hidden.
One such page is People and Groups that shows Group selection panel in left navigation bar.

sp2013_GroupSelector

So the problem is how to successfully hide the quick links from in left navigation on all pages but still have additional items shown on certain pages in the left navigation (i.e. for example the Group selector on People and Groups page)

Solution:

Try below css (instead of one shown above):

.ms-core-sideNavBox-removeLeftMargin { display: none } /* hide only quick links */
#contentBox { margin-left: 0px } /* make content take full page width */

Explaination:

Div with id sideNavBox is the main container of left navigation box. But it is not the actual container that holds the quick links.

SP2013 Left Navigation Element Hierarchy

Actually quick links is contained by another div with class ms-core-sideNavBox-removeLeftMargin which is a child div of div with id sideNavBox.

Now people and groups left panel items are not contained in this div with class ms-core-sideNavBox-removeLeftMargin but is instead contained in div above it with class ms-ql-additionaltopsection (as shown in above image).

So our solution above hides this actual quicklinks containing child div:

.ms-core-sideNavBox-removeLeftMargin { display: none } /* hide only quick links */

instead of its parent container

#sideNavBox { display: none } /* hide left navigation box */

Make a list view with multiple columns from single lookup column

SP2013_logo[Requirement]

Lets say we have a “company” list with following fields

  1. Title
  2. Name
  3. Phone

We have another list “workers” which has a lookup colum from “company” list.

Now our requirement is that in our “workers” list view, we want to also show Name and Phone column values for our looked up (company) list.

[Solution]

There is a very simple out-of-box solution for our requirement.

When we are creating the new lookup column in our workers list, it would ask us for the list from which we want to lookup (company in our case).

After that we need to specify which column’s value we want to use as lookup value; this will be filled in the drop-down on our worker item’s add/edit form.

Underneath that it would show a list of all columns available in the looked up (company) list.

Sp2013 CreateLookupColumn

Select all columns that we want to show (Name and Phone in our example case) and they would each show up on our (worker) list view.

Sp2013 MultilookupColumns

Note: dont think that now you would be asked for values of all these other selected columns when you are creating a new (worker) item. It would only ask for the primary column value (company title in our example). The other selected columns are only for display purpose and fetch values directly from looked-up list item.

Power-shell command to determine the version of installed power-shell engine

powershellAt times you would come across facts like blah-blah command is supported in so-and-so version of power-shell. When such facts are encountered, the first thing that comes in one’s mind is “What version of power-shell am I using?”.

The answer to this question can be obtained by running following small command in your available power-shell console:

$psversiontable.psversion

Note: If you do not get a result for the above command, then don’t panic, but safely consider that you are using the v1.0 of power-shell engine, as this variable is not present in v1.0.

Caution: Some of you might be using the command “$host.version” to achieve the required result. But mind you, it is not the correct method. The reason is that command “$host.version” gives the product version of the host application using the power-shell engine. When you use the bare simple power-shell interface to execute your commands/scripts, you would get same result through both commands as in this case the host version and engine version go hand-in-hand and so are same.

Get current power-shell script directory path in your power-shell script

powershellAt times while writing power-shell scripts, you may need to refer to directory path of your current script in your script. The most common reasons for doing this may include referring to any content at the same location or relative to the current script’s location.

If the above line is confusing or needs more explanation, here is an example (Though if the matter is clear, you can skip this paragraph). I have a power-shell script, from which I want to refer to a file placed at the same location where my script-file is located; say other-file. I would be providing this whole folder (i.e. the script-file and the other-file inside it) to a client. Now I don’t know where the client would place this folder on his machine. So to correctly refer to the other-file while executing the script-file, I can get the script-file’s location and refer the other-file using this path. This would allow me to correctly refer to the other-file irrespective to its folder location.

This can be achieved through the following command:

$scriptPath = split-path -parent $MyInvocation.MyCommand.Definition

If you are using PowerShell 3.0 or later, you can also use the following command to achieve the same result (in case you are wondering which version of power-shell are you using, refer my other post Power-shell command to determine the version of installed power-shell engine):

$scriptPath = split-path -parent $PSCommandPath

Just to note: the two commands “$MyInvocation.MyCommand.Definition” and “$PSCommandPath” both provide the full path of currently executing script. So in above solution we are getting the parent folder path from this full path.

Happy POWER scripting !!

IIS error “iis the process cannot access the file because it is being used by another process (Exception from: hresult 0x80070020)”

IIS ErrorToday while accessing my default port 80 website in browser, I was greeted with “Internet Explorer cannot display the page” message. To this while inspecting in Internet Information Services (IIS) Manager, I found the Default site to be in stop state. So as any other geek would do, I pressed the “start” button. But booom: the site didn’t start up and gave a bizarre dialog box saying

The process cannot access the file because it is being used by another process (Exception from: hresult 0x80070020)

If you try to figure this thing out by yourself (i.e. without using any search engine), I bet you would never be able to find the culprit. Thanks to Google and peer geeks who shared the same issue, I was finally able to get the site up again.

And guess who the culprit was: SKYPE !!!

Shocked !!? Well at least I was when I first came to know about it. After all what the hell does skype has to do with default site’s working in IIS, totally didn’t make any connection or sense to me initially.

The thing is, by default skype tries to use port 80 for its functioning, if port 80 is not already used by some other application. Now in most cases for above error, some how skype found port 80 free and so started using it. And now when you try to start your website at port 80, poor guy cannot function as the port is already in use; simple as that.

Solution (If you have skype running):

Sign-out of your skype, hit “quit” from its running instance available through system tray icon, and then try starting the default website in IIS manager.

Tip: If you want to get more information on port bindings for a system, fire up the command “NETSTAT -ano” in your command prompt.

It worked for me and mostly would work for you as well !!

Methods to free up disk space in windows system drive

Free disk spaceIf you are using windows operating system and are struggling to free up space in your system drive (usually c: drive) (which is showing used space in red color) then following are some methods you can perform to free up some useful amount of space:

1) Empty Recycle bin

First and foremost you should go ahead and empty your recycle bin by:

Right click on “Recycle bin” icon (generally found on your desktop) > click on “Empty Recycle Bin” > click “Yes” on the confirmation dialog that appears

The reason this is needed is because deleting a file or folder does not free up space on your drive. This happens because these deleted files/folders are moved to recycle bin and do take up same amount of space as they took before deletion (except the ones deleted using “Shift + Delete” option). Emptying the recycle bin is actually when the files are removed from disk.

Note: Emptying the recycle bin does not practically erase the files from disk but that space is still available for new files. Due to this fact, if needed these files can be reacquired by various software. A good FREE software to do this is “Recuva“.

2) Disk Clean up

This is the process of removing not so trivial unused system files from your system. Follow following steps to do a disk clean up:

Right click on system drive in windows explorer > click on “Properties” > click on “Disk Cleanup”

This would take some time to identify files on your drive which can be cleaned up. Don’t worry, these would not be any of your personal files, but wold be system files. You may find that not all items are checked on the resultant dialog, but you can go ahead and select all items as it is generally safe to delete all shown files. At the bottom of the items listing the dialog displays the amount of disk space it would free up.

Click “OK”

and you would have freed a good amount of space on your drive (if you have not done this recently).

3) CCleaner

To free up more space other then what is identified by system “Disk Cleanup”, a good little FREE software is “CCleaner“.

Once you install and run this software:

Click “Analyze” button (under “Cleaner” tab)

This would take some time as it identifies possible areas from which files can be cleaned up. Once it is done it would show you a complete list of files, its location and the total amount of space that would be freed up by removing them.

Click “Run Cleaner” button

This would take some time again and would show you progress of the cleaning process. When this is done you would find your system drive freed up with the previously mentioned space.

4) Disable Hibernation

Hibernation is a feature in windows that helps to retain system state even if it is not functional (i.e. power-down). The way it functions is it stores your RAM (Random Access Memory) data in a file called “hiberfil.sys” which is hidden under your system drive (usually c: drive). This takes up as much space as much of RAM your system possess (i.e for example if you have a 4 GB RAM in your system, then the hiberfil.sys file would be of approx. 4 GB size).

But if you are rarely using the hibernation feature or are not using it at all (which is a good case with most people with desktop machines), then it is wise move to disable this feature (which is enabled by default) and free up some useful system drive space.

To disable and delete the hiberfil.sys file, run following command on your command prompt (i.e. cmd.exe) in “run as administrator” mode:

powercfg -h off

Note: To re-enable hibernation back, run above command replacing value “off” with “on”.

5) Uninstall non-used programs

If you still need more space to be freed up, you must consider uninstalling non-used or any rarely used software from your system. This can be done through:

Click Windows button > click “Control Panel” > click “Programs and Features”

This would show you list of all software installed on your system. Select any software item you are not using and click “Uninstall” (on top bar, or available on right click menu).

HAPPY CLEANING !!

Minimum coding tips/standard every developer should follow

Coding tipsSo far with my experience in IT industry, I have seen only a fraction of developers following any sort of coding standards. They are seen to only focus on the logic part and don’t care about following any convention or standard practices.

When getting views from some of these developers, what came out was that most were either not aware of standard coding practices and the one who knew believed that the documentation out there was a lot lengthy and time consuming to read. Also many good day-to-day practices are not covered in most coding standard articles/documents and they only focus on naming conventions and similar stuff.

So I brain-stormed and came up with following compilation/points that I believe any developer should follow to write better and more maintainable code.

Note: I use C#.net as my primary language of development, so you may find some points specific to this language; otherwise most of the points are general and can be followed in most modern object oriented languages.
 
  1. Follow naming conventions
  2. (Note: there are three type of casing; (1) PascalCasing (2) camelCasing (3) hungarianNotation [which is equivalent to some prefix + PascalCasingName])
    1. All function parameters and local variables use camelCasing
    2. All control names use hungarianNotation (e.g. if you have a textbox for first name, then its id would be txtFirstName. other examples are btnSubmit [button], drpCountryNames [dropdownlist/combobox], tblCurrentData [table], grdEmployees [grid] etc.)
    3. Everything else will use PascalCasing.
  3. Give meaningful names for everything (i.e. class, properties, functions, events, namespace etc.)
  4. Function names should always be verbs.
  5. All other names should always be nouns.
  6. Always think and decide whether a function can be made static or not. (Tip: If a function is not using only local variables then it has a much better chance of being made static)
  7. Always think whether any hard-coded string can be made constant/readonly or not.
  8. For naming events use the syntax: controlId_EventName (e.g. btnSubmit_Click, grdData_RowBound etc.)
  9. Always write functions doing a specific functionality. Don’t write functions doing a lot of functionality. If found so, see if they can be split into further functions which can enhance code re-usability.
  10. If you find yourself writing any common function that someone else can also use, place the same in a utility project or class. Also give proper name for its container class.
  11. Always provide summary comments on each element. Only in cases where the name is self explanatory TO EVERYONE UNIVERSALLY, summary comments can be ignored.
  12. Use #region to group elements in a code file.
  13. Always try to create separate regions for elements: Constants, properties and variables, exposed functionality, internal functionality, page events (for web pages), control events, constructors etc.
  14. Always decide whether an element must be made public, private, or protected. (Tip: As a rule-of-thumb, make everything private, and then decide which part/elements are needed publicly or can be made protected)
  15. Never make a public variable in a class. Instead create a public property if needed to be exposed publicly (Tip: If you need to create property specific for a private variable, the private variable can use naming convention of underscore followed by name of property that exposes it. This shows clear association between the private variable and its property, and also helps you not accidentally use that private variable that is instead intended to be used through its property).
  16. All interfaces should follow the syntax: INameOfInterface (e.g. IEnumerable, IDictionary, IMyInterface etc.)
  17. When providing in-code comments use “/* */” commenting notation instead of “//”. Also in-code comments are also highly recommended; especially for complex code modules.
  18. Each function must be self content; i.e. must not depend on something else for its proper functioning; especially public function. each function should at-least check for correctness of its parameters. (Note: This does not mean a function should not call other functions, but should not be dependent on them for correct behavior, i.e. should always do proper error checking and validations by itself)
  19. Throw exceptions while validating input parameters.
  20. Never have a catch block with no code in it; if so required, mention the reason for doing the same.
  21. Only catch exceptions for which you have proper actionable steps.
  22. Create overloaded functionality where-ever you feel possible and useful.

Hope you find the above tips/standards useful.

I would appreciate your comments if you have more points that could be included in this list (which I suppose you would definitely have) or regarding any doubts on any of the above points.